Étape 1 :
Le site Setup.exe est compatible avec les trous filetés et les trous carrés. Par défaut, il est équipé de boulons pour les trous carrés. Si vous avez un rack réseau avec des trous filetés, vous devez d'abord changer les boulons.
Étape 2 :
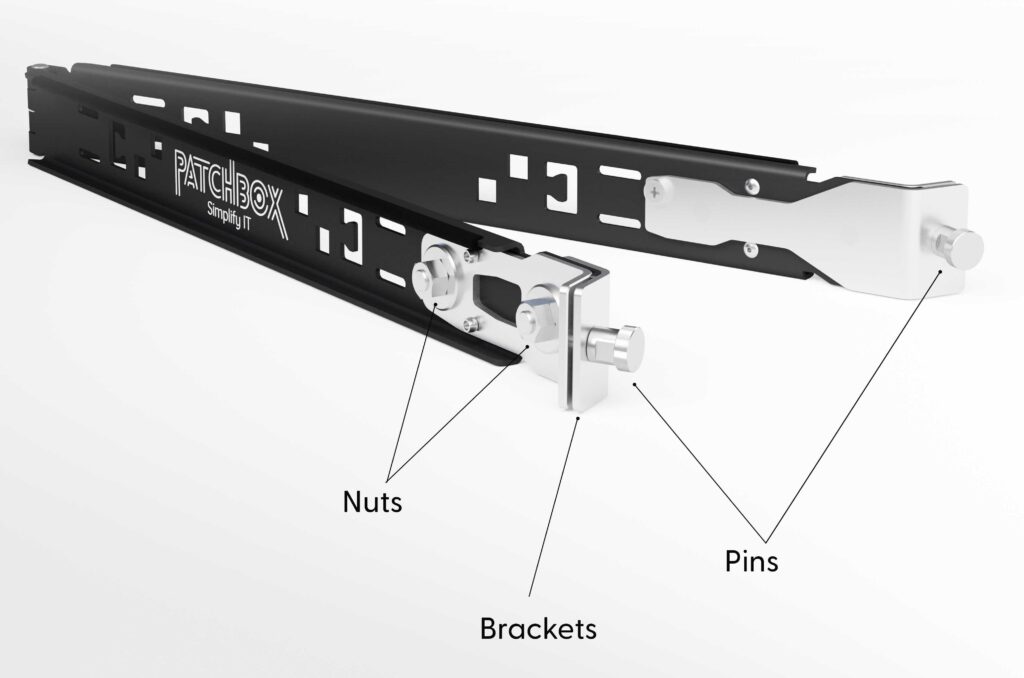
Desserrez les boulons des deux supports à l'aide d'une clé (10 mm ou 3/8″) et retirez-les.
Étape 3 :
Prenez maintenant les autres boulons et insérez-les dans les trous.
Étape 4 :
Ajustez les supports : Il se peut que les supports soient trop larges ou trop étroits par rapport à l'épaisseur de votre rail 19".
Étape 5 :
Pour l'ajuster, desserrez les deux écrous d'un côté à l'aide d'une clé (13mm ou 1/2″). Vous pouvez maintenant faire glisser la partie intérieure des supports et l'ajuster à votre rail de 19".
Étape 6 :
Avec les écrous desserrés, faites glisser les supports Setup.exe sur le rail de 19", poussez les supports ensemble à la main et serrez les écrous. Les supports doivent reposer fermement sur le rail de 19 pouces, mais peuvent avoir une certaine marge de manœuvre. Retirez le site Setup.exe du rail de 19", puis resserrez les écrous.
Étape 7 :
Le Setup.exe doit être placé une unité de rack en dessous de l'unité de rack où vous voulez monter le matériel (max. 50kg/110lbs). Alignez le Setup.exe sur le rail 19" - ne l'ouvrez pas encore. Le rail 19" doit s'insérer entre les supports.
Étape 8 :
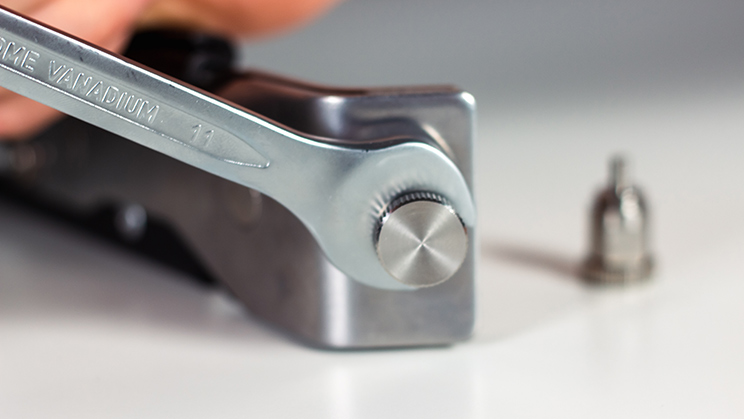
Tirez sur la goupille du support Setup.exe , en veillant à ce qu'elle s'enclenche dans le trou du rail 19".
Étape 9 :
Fixez à nouveau le site Setup.exe sur le côté opposé, en veillant à ce que la goupille du site Setup.exes'enclenche dans le rail de 19 pouces.
Étape 10 :
Le site Setup.exe a deux faces - une face en caoutchouc pour maintenir votre ordinateur portable en toute sécurité et l'autre face pour l'installation afin de guider facilement le matériel dans le rack du réseau.
Étape 11 :
Pour retirer le Setup.exe, tirez sur la goupille pour le déverrouiller du rail 19". Fermez le site Setup.exe et répétez l'opération de l'autre côté.